If your app setup is loose, trips can be missed, data can be wrong, and claims can get denied. I’d treat this as a four-part setup job: lock down user access, approve phones and vehicles, map trip data and GPS, then train staff and test the workflow before launch.
Here’s the short version:
- Set clear roles: admin, dispatcher, driver, billing, compliance, and attendant
- Use one login per person: shared accounts weaken the audit trail
- Lock device rules: PINs, auto-lock, encryption, offline trip sync, and current iOS/Android versions
- Tie drivers to vehicles: confirm vehicle ID, odometer, and pre-trip inspection at sign-in
- Map required trip fields: trip ID, rider ID, addresses, timestamps, mileage, mobility type, no-show reason, and electronic signature
- Turn on GPS tracking: test background location, weak-signal logging, and sync after service returns
- Check EVV records: service type, person served, provider, date, location, and start/end times
- Match broker and Medicaid rules: make sure exports line up with billing and audit needs
- Run a pilot first: test ambulatory, wheelchair, stretcher, no-show, will-call, and reassignment cases
- Watch week-one results: GPS accuracy, app use, call volume, and claim readiness
A few numbers stand out. The article notes that Medicaid denials tied to eligibility or documentation average 15% to 20%. It also points to cases with $84.3 million in improper reimbursements and $350,000 in repayments tied to bad trip records. That’s why I’d focus on setup before scale, as NEMT software vs. manual dispatch efficiency becomes critical past five vehicles.
| Area | What I’d confirm |
|---|---|
| Access | Role-based permissions and separate logins |
| Devices | Security settings, offline mode, supported OS |
| Vehicles | Vehicle match, odometer, inspection form |
| Trip Data | EVV fields, GPS timestamps, signatures, no-show codes |
| Billing | Broker-ready exports and no manual re-entry |
| Launch | Driver training, dispatcher drills, pilot trips, first-week review |
The main goal is simple: one trip record should move from dispatch to driver app to billing without extra typing, missing fields, or weak GPS proof.
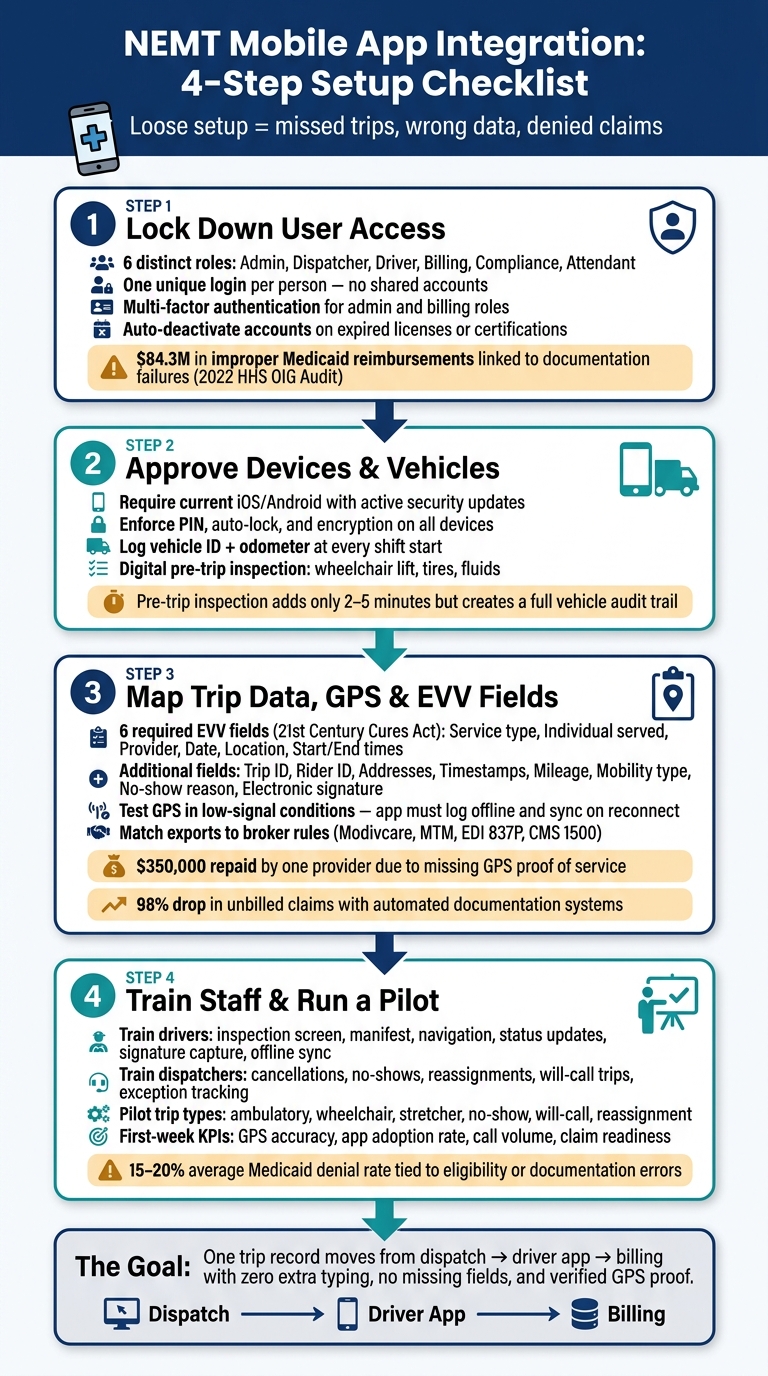
NEMT Mobile App Setup Checklist: 4-Step Integration Workflow
Checklist 1: Set User Roles, Permissions, and Login Access
Before your first driver signs in, set up your dispatch platform and mobile app with clear user roles. Each person should only see and do what’s needed for their job.
Assign Dispatch and Field Roles Clearly
Most NEMT teams need at least six separate roles: System Administrator, Dispatcher, Driver, Billing Specialist, Compliance Reviewer, and Attendant (or subcontracted driver, if that applies). Each role lines up with a different set of tasks.
| Role | System Access | Key App Actions |
|---|---|---|
| System Administrator | Full config, HR, financial KPIs | Oversight of all active routes |
| Dispatcher | Real-time console, scheduling, GPS tracking | Message drivers, reassign trips |
| Driver | Basic profile only | Manifests, navigation, signature capture |
| Billing Specialist | Claims (837P/CMS 1500), denial tracking | Back-office only |
| Compliance Reviewer | Audit logs, credential tracking | Verify vehicle inspection checklists |
| Attendant | Assigned trips only | Limited manifest view, care notes |
Keep every role tight. If someone doesn’t need access to a screen, record, or setting, don’t give it to them.
Once those roles are in place, connect each one to its own login.
Create Unique Logins and Identity Controls
Shared logins are a bad idea. They wreck your audit trail because you can’t tell who did what. Every user needs a separate username tied to one person.
That matters because trip actions need to point back to a single user. If a route changes, a signature is collected, or a record is updated, you should be able to trace it without any guesswork.
Use secure passwords and, when the platform allows it, turn on multi-factor authentication for administrative and billing roles. You should also set accounts to deactivate automatically when a driver’s license or required certification expires.
Match Permissions to Contract and Documentation Rules
Once access is set, match each role to the exact trip fields it can view or edit.
This is where compliance gets very practical. Under the 21st Century Cures Act, EVV data must record six items on every trip: service type, individual served, provider identity, date, location, and start/end times. Your driver app should collect all six every time.
A 2022 HHS OIG audit found that New York improperly claimed $84.3 million in federal Medicaid reimbursements because trip documentation did not meet the rules.
Set permissions around the records your brokers and state Medicaid agency may ask for during an audit: actual pickup and drop-off times, driver identity, GPS-verified location, and signatures. If a role should only view a field, leave editing off. Less manual input usually means fewer documentation mistakes.
sbb-itb-af83355
Checklist 2: Approve Devices, Security Rules, and Vehicle Assignment
Once roles are in place, the next step is locking down the devices and vehicles tied to each trip. If a phone is set up badly, it can wreck your GPS trail, drop trip records, or put patient data at risk.
Set Device Standards for Daily Field Use
Not every smartphone belongs in the field. Before rollout, set one minimum standard for both company-issued and personal devices.
Each device should run a current version of iOS or Android and receive active security updates. It also needs GPS, offline trip capture, and auto-sync when service comes back. Most modern NEMT mobile apps work on both platforms and should keep recording trip data in low-signal areas without losing records.
Apply Security, Privacy, and Safe-Use Rules
Every enrolled phone should have a PIN, auto-lock, and encryption turned on to stay HIPAA compliant. For trip-related data, use encrypted storage, audit logs, and secure in-app messaging.
This isn’t just an IT box to check. Drivers are handling trip details tied to patient care, so a basic phone lock and secure data handling go a long way.
Verify Vehicle Assignment and Shift Start Data
Before the first trip of the shift, the app should confirm that the driver is in the right vehicle. Each driver should log the vehicle ID and odometer reading at shift start. That gives you a clean mileage record and links GPS data to the right unit from mile one.
For vehicle assignment, the setup usually looks like this:
- Use QR scanning for mixed mobility fleets
- Use automated assignment when broker feeds are available
- Use manual entry only for small fleets with simple rotation
You should also require a digital pre-trip inspection during sign-in. Drivers need to confirm wheelchair lift function, tire condition, and fluid levels before they can open their daily manifest. This adds 2–5 minutes to clock-in time, but it also creates an audit trail for vehicle safety.
Once device and vehicle identity are locked in, those records can be mapped to GPS and trip fields.
Checklist 3: Configure GPS, EVV, and Required Trip Data Fields
With access and vehicle checks done, the next step is the data layer. Set the app so it captures the details that matter on every trip: essential dispatch software features like timestamps, locations, and the documentation fields that payers and auditors expect to see.
Turn On GPS and Test Continuous Location Settings
The app needs location permission that supports background tracking and a continuous GPS trail for audit records. Before go-live, run a full trip simulation and watch the dispatch panel to make sure location updates stay unbroken from start to finish.
It’s also smart to test weak-signal conditions. If service drops, the app should keep recording data locally and then sync the full GPS log when connectivity comes back. This isn’t just a nice extra. One NEMT provider had to repay $350,000 because their system couldn’t verify proof of service with GPS logs.
Map EVV and Trip Documentation Fields End to End
Under the 21st Century Cures Act, EVV compliance means recording six core data points: service type, individual receiving service, provider name, date of service, location, and exact start and end times. For billing, you’ll usually need more than that.
| Trip Data Field | App Entry Point | Dispatch/Billing Export |
|---|---|---|
| Trip ID / Auth Number | Broker feed import | Claim header (837P / CMS 1500) |
| Rider ID / Member ID | Manifest view | Eligibility check |
| Pickup / Drop-off Address | Navigation start and end | Mileage calculation |
| Pickup/Drop-off Timestamps | "Arrived" / "Dropped" buttons | EVV compliance log |
| Mobility Type | Rider profile / vehicle rule | HCPCS code mapping (e.g., A0130) |
| Odometer / Mileage | Manual entry or GPS-calculated | Distance-based reimbursement |
| Electronic Signature | Drop-off screen capture | Audit-ready proof of service |
| No-Show Reason | Exception drop-down menu | Broker exception report |
Missing fields can get expensive fast. A 2022 HHS OIG audit found New York improperly claimed $84.3 million in federal Medicaid reimbursements due to missing trip documentation and non-compliance.
Check Broker and Medicaid Record Readiness
Next, compare your exports with the required fields for each broker and state Medicaid program. The details can vary more than people expect. Colorado, for example, requires EDI 837P submissions with diagnosis code R68.89.
It also helps to match your setup to the platforms you work with most. Modivcare and MTM each have their own documentation rules, and API-based broker sync cuts down on the manual entry mistakes that lead to mismatched rider IDs or authorization numbers. Operators using automated documentation systems report a 98% drop in unbilled claims.
Once the field map lines up with broker and Medicaid rules, move to driver training and pilot trips.
Checklist 4: Train Drivers, Run Test Trips, and Confirm Go-Live
With roles, devices, and trip fields set up, the next step is simple: test the live workflow before go-live.
Train Drivers and Dispatchers on the Exact Workflow
Training needs to cover the full trip flow, not just the basics. Drivers should learn the inspection screen at sign-in, manifest review, navigation, status updates, signature capture, and trip timestamps. They also need practice with incident reporting. Before launch, make sure they can handle offline sync and account recovery too.
Dispatchers need their own hands-on training. That includes cancellations, no-shows, reassignments, same-day trip add-ons, will-call trips, and exception tracking.
This part matters more than teams expect. A workflow can look fine in setup, then fall apart once phones start ringing and trips start stacking up.
Run a Small Pilot Before Full Deployment
A pilot shows whether the training holds up during live trips.
Run a small pilot across ambulatory, wheelchair, and stretcher trips. Then check that live status updates, signature capture, and billing export all work without manual re-entry.
It also helps to pressure-test the system on purpose. Add a stretcher patient mid-day, simulate a driver call-out, and trigger a will-call trip. If the workflow holds, you’re in good shape. If dispatchers start calling drivers to confirm statuses, that’s a sign the team needs more practice before you scale.
Conclusion: Final Go-Live Checks and First-Week Review
Before launch, confirm that the pilot proved live status updates, signatures, and billing export. Check that role permissions, unique logins, and device security rules are in place. Also verify that offline data sync works end to end.
In the first week, watch GPS accuracy, app adoption, and claim readiness. If dispatch gets more calls than expected, training gaps are still there. Medicaid denials caused by eligibility check failures or documentation errors average 15% to 20%.
FAQs
How long should app integration take?
For small-to-mid-sized fleets, integrating NEMT mobile apps with scheduling software usually takes 1 to 4 weeks. Larger enterprise platforms often need 4 to 6 weeks, especially when multi-state billing gets more involved.
That timeline usually covers system setup, driver training, broker certification, and workflow fine-tuning. Some providers move faster and can go live in as little as two weeks.
What should we fix before going live?
Before going live, confirm readiness with structured testing so you don’t run into dispatch or billing problems.
Check the full trip lifecycle first. Make sure staff aren’t re-entering data, broker API connections work as expected, migrated data is clean, and trip data flows into claims without manual cleanup.
Then run a small pilot. This helps you verify GPS accuracy, app usability, and EVV-compliant documentation in day-to-day use. At the same time, confirm driver training is complete and that there’s a clear support process for connectivity issues or other technical problems on active routes.
How do we know the setup is audit-ready?
Your setup is audit-ready when it replaces manual work with automated, electronic, time-stamped records. That means it should track EVV data, GPS-based pickup and drop-off times, digital passenger signatures, and cloud-based logs for driver certifications, vehicle inspections, and insurance.
It should also support broker API integrations, clean trip-history and billing records, claim-scrubbing tools for state Medicaid rules, and a pilot data-migration audit before the full rollout.